Chapter 1: Introduction
Note: This documentation is still work in progress. Only Chapter 1 is done.
Developing scripts for Maya is equally confusing and complicated. Therefore, I developed the Xwift pipeline to make developing for Maya fast and easy. I believe a lot of people will benefit from Xwift shelf to build and organize their toolkits, life is simply many, many times easier.
1.0 - Background Story (Optional)
The guy who led me into the craft of tech art once said: "One does not seek tech art for a career, tech art selects its followers." That is, Technical Art is very much like witchcraft, everyone finds their own way here, mostly by searching and a lot of trial & error.
I started to develop my own tools when I was producing my animated short, "Dazzle!", at University of Washington's Animation Research Labs. It initially started as making small fixes to continue the animation production during pandemic, because many things break when using them remotely. As time grows, I have a handful collection of tools I developed, and I needed a way to organize them.
I started developing an automatic deployment and reload script by a lot of googling, and started to build my own shelf to host all my tools. I improved my implementation of Xwift shelf from some blog posts I could find online, and had all my tools organized in one place.
Xwift shelf is not my entire toolkit, as my tools remain private at the moment. Instead, it is a good backbone that anyone can build and organize their tools upon, and should make a lot of people very happy.
1.1 - What is Xwift Shelf?
In short, I am providing you with three things:
Basically, it is a much, much more painless way to develop for Maya.
1.2 - The Old Workflow
In this section, I will briefly talk about the old workflow to develop scripts in Maya. If you are familiar with the traditional Maya development workflow, feel free to skip this section as well. However, it should be very useful for anyone who is interested in how Maya scripts work.
Running Python scripts in Maya is simple, you write some code in the script editor, and you run that script, and it should work. It sounds easy, until you start to do any serious tool that is more complicated than generate random cubes.
In my opinion, there are several downsides for developing Python scripts directly inside Maya's Script Editor:
1.3 The (Slightly) Better Workflow
I can go on and on, and the idea is it is just not a good idea to develop in the Script Editor. In fact, based on my industry experience, people don't do this as well, studios usually develop their code in Pycharm and pass the code to Maya using a plug-in called Mayacharm.
Pycharm is probably the most powerful Python IDE on the market, and their community version is free to use. Using the free Mayacharm plug-in, it automatically sends the code you wrote in Python to Maya's Script Editor, and run it. That is how most people nowadays develop their script for Maya. You can think of it as a better script editor, but the workflow is still more or less the same.
1.4 The Problem
However, I find this solution far from perfect.
C:\Users\hongj\Documents\maya\2023\scripts that is difficult to find)
if you want to import functions in other scripts.
There is no way to easily just develop in a Git repository and run code from there.
reload(YOUR_SCRIPT) command each time you made any changes in your code,
otherwise Maya will not use the updated script.
Xwift Shelf was developed to solve these two problems which creates the most redundant and unnecessary work during development. You can develop your scripts in a repository, and once you run it, everything just works as it intends to be. In the next section, I will introduce you to the new workflow.
1.6 The Xwift Workflow
I have no intent to completely revolutionize everything, the Xwift pipeline builds on the PyCharm+Mayacharm workflow, just making it easier.
xwift_shelf repository) instead of MAYA_SCRIPT_PATH.
playground.py and press Alt+A, which is faster than mapping the function to a button.
reload(YOUR_SCRIPT) when you make any changes, your codebase is automatically refreshed when you send your code out from the playground.py.
1.6 How does it work???
If you read through section 1.2 to 1.6, you might find the Xwift workflow deceptively simple and too good to be true. I will briefly explain how it works.
reload_util.py which automatically copies and pastes the code repository into MAYA_SCRIPT_PATH.
Essentially, it is doing the boring work in the background automatically, and because computer does this so fast, it looks like you are running your code from the repository.
Below is an example playground.py, and at this point, you should have a rough idea of what reload_util is doing.
                import reload_util

                REPO_PATH = "C:/Users/hongj/PycharmProjects/xwift_shelf/xwift"
                reload_util.reload_from_playground(REPO_PATH)


                # =============== Run your code below =============

                # Here is an example to run the asset library UI.
                # from asset_lib import library_ui
                # ui = library_ui.showUI()
Chapter 2: Get Started
In this section, I will walk you through how to setup xwift_shelf.
Note: This looks long because is a babysit tutorial that covers in great detail. Once you get it, it is brainless to run.
2.1 - Gather Resources
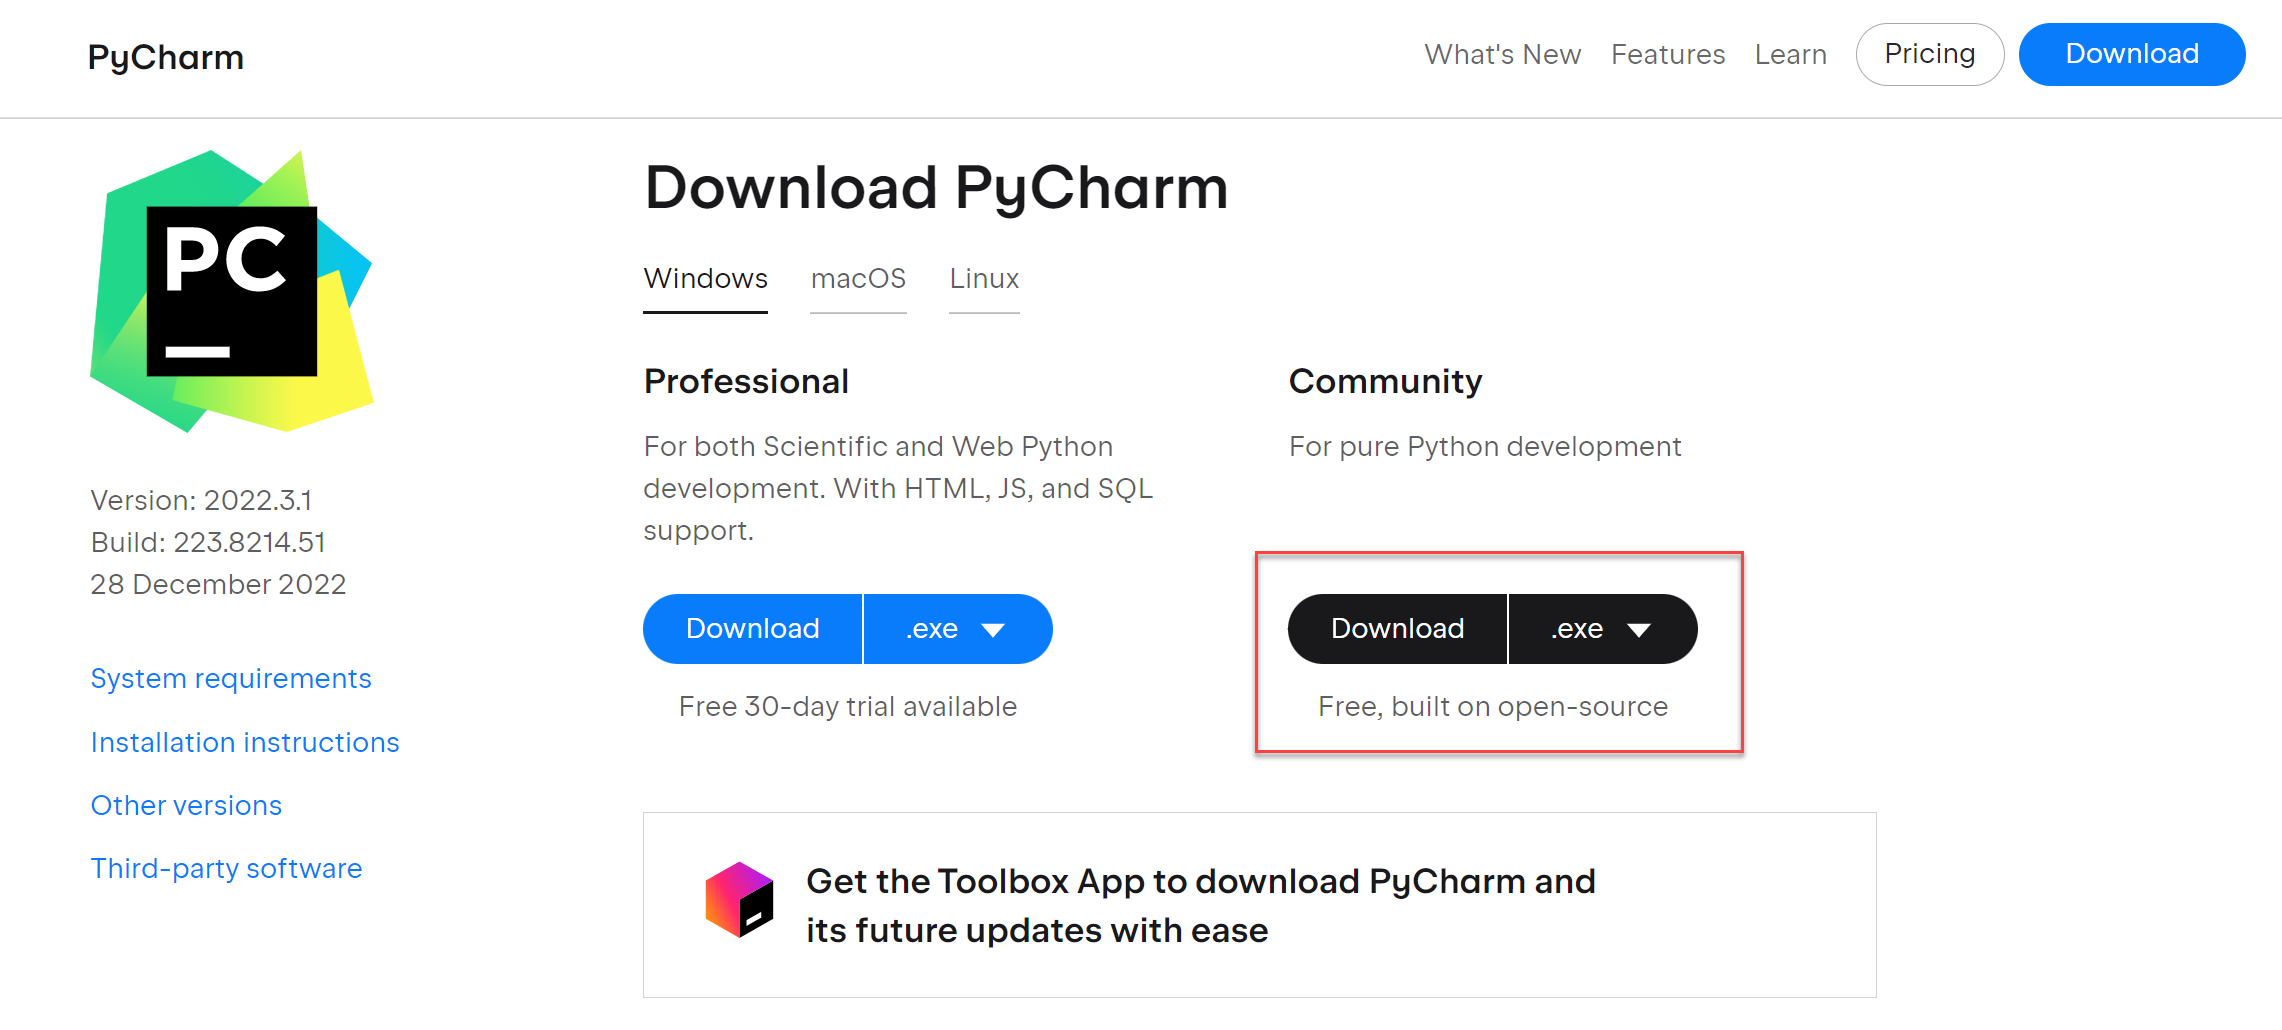
Before everything, let's install some prerequisites. I will show you how to install PyCharm and Mayacharm.
To install PyCharm, simply head over to the Pycharm Official Website and download the Pycharm Community version. You can of course use PyCharm Professional, but as a PyCharm Professional user myself, I can say it does not add any benefit to Maya development except maybe you have some money to throw into the water. Just use the PyCharm Community.
Then, head over to Jetbrains Marketplace for Mayacharm and download the newest version of MayaCharm.
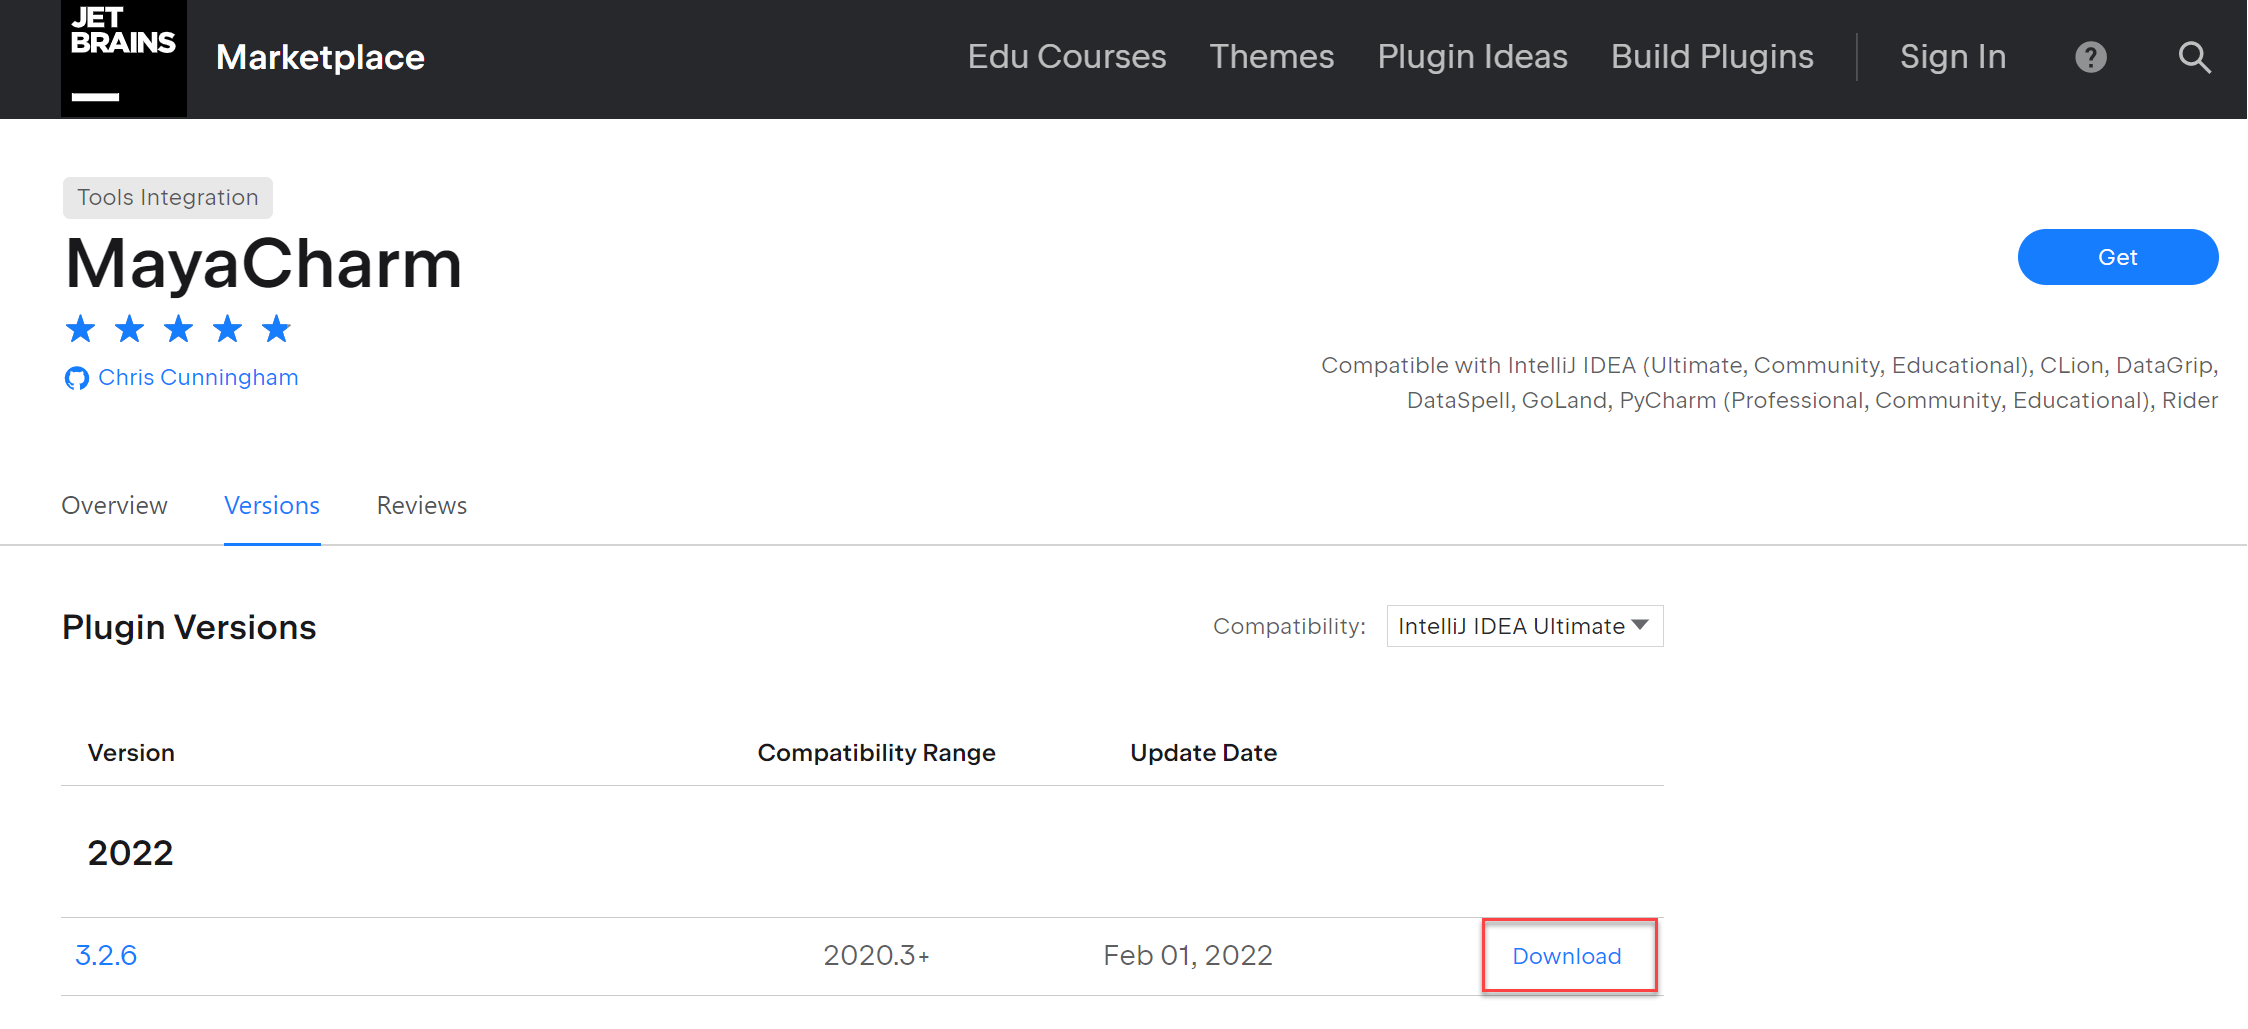
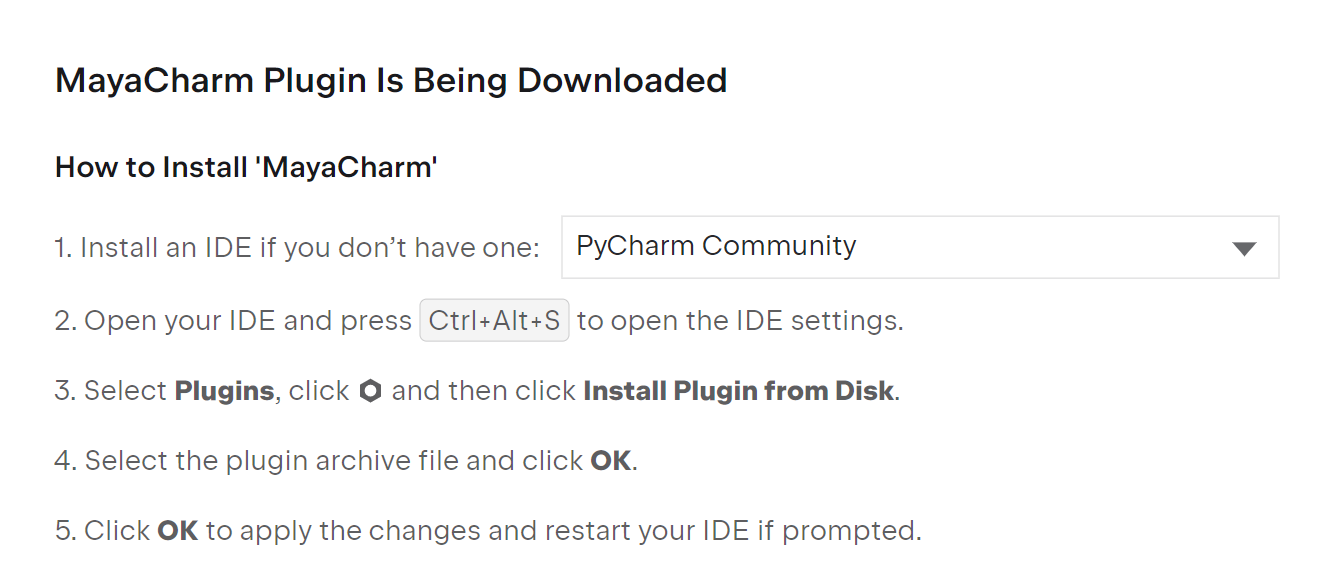
Install Mayacharm using the official guide, which I provided a screenshot below.
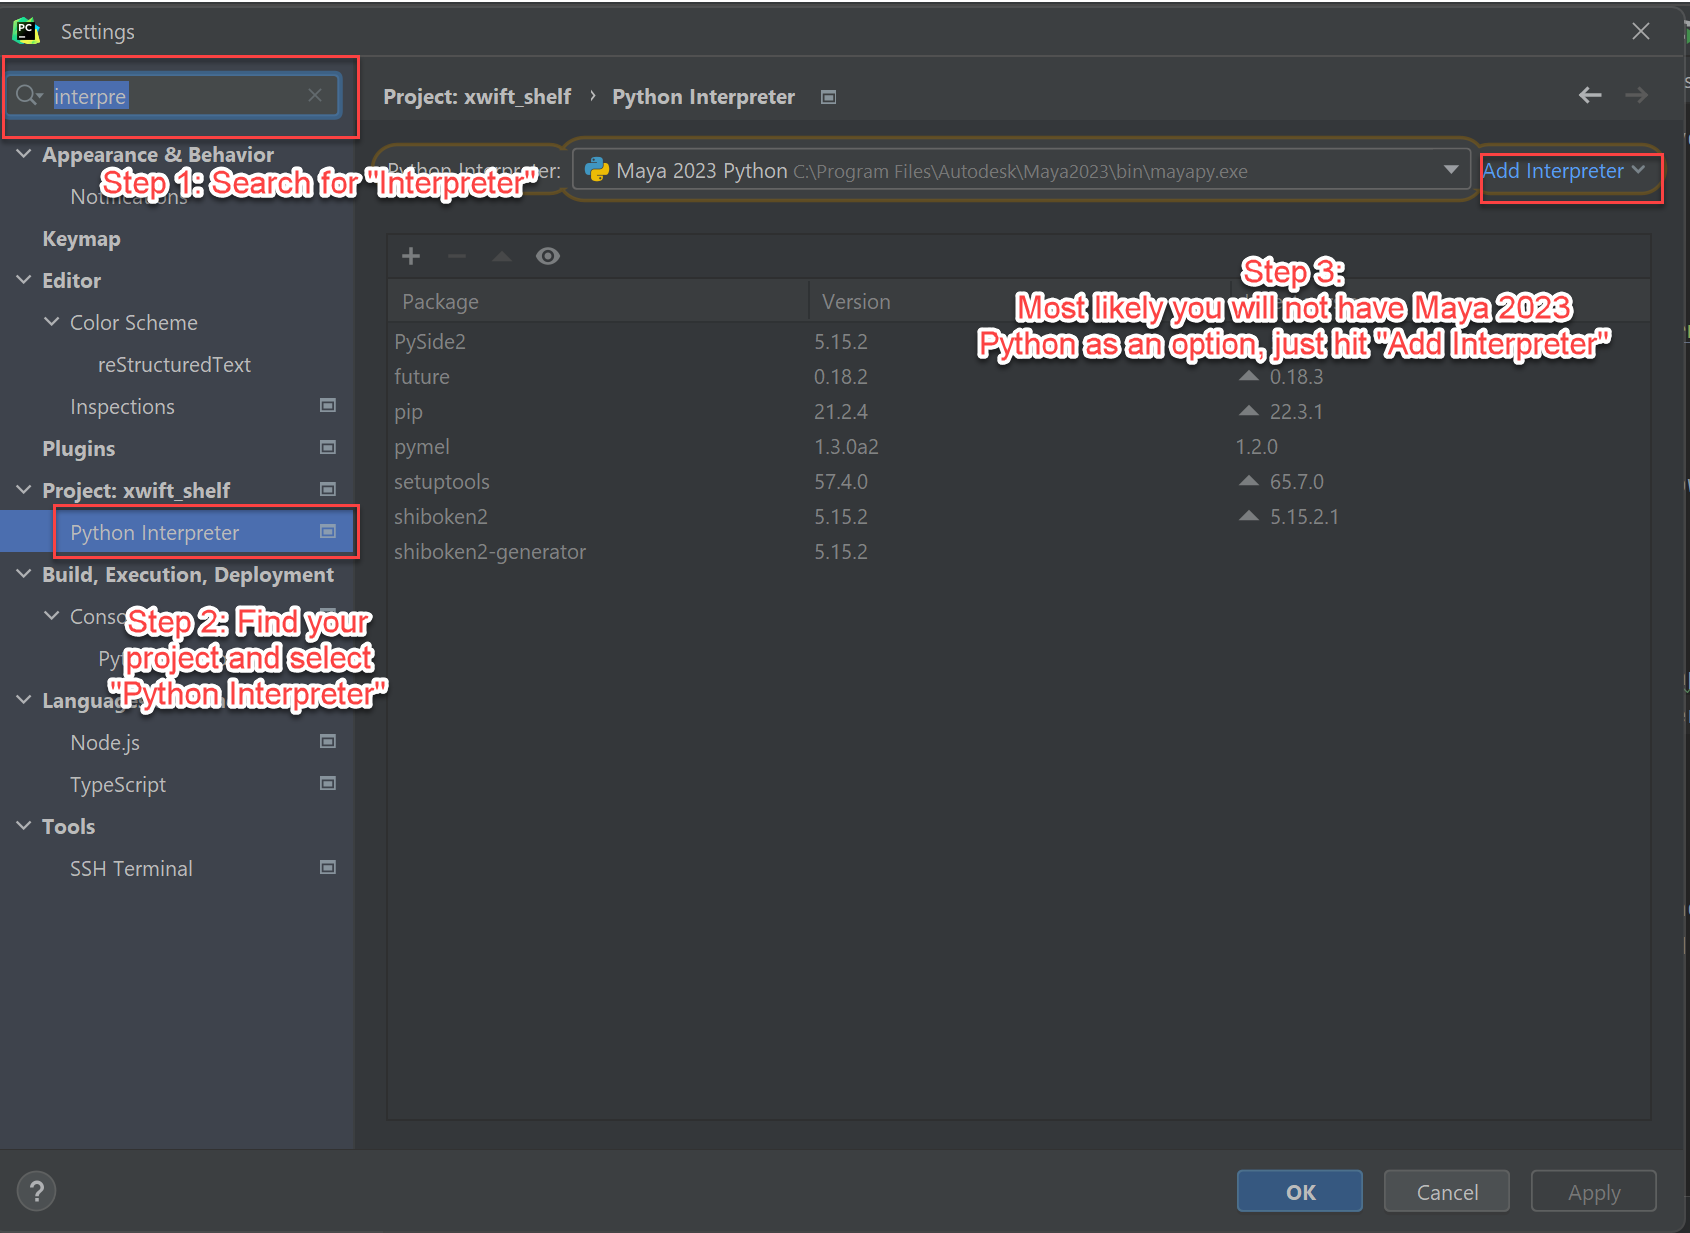
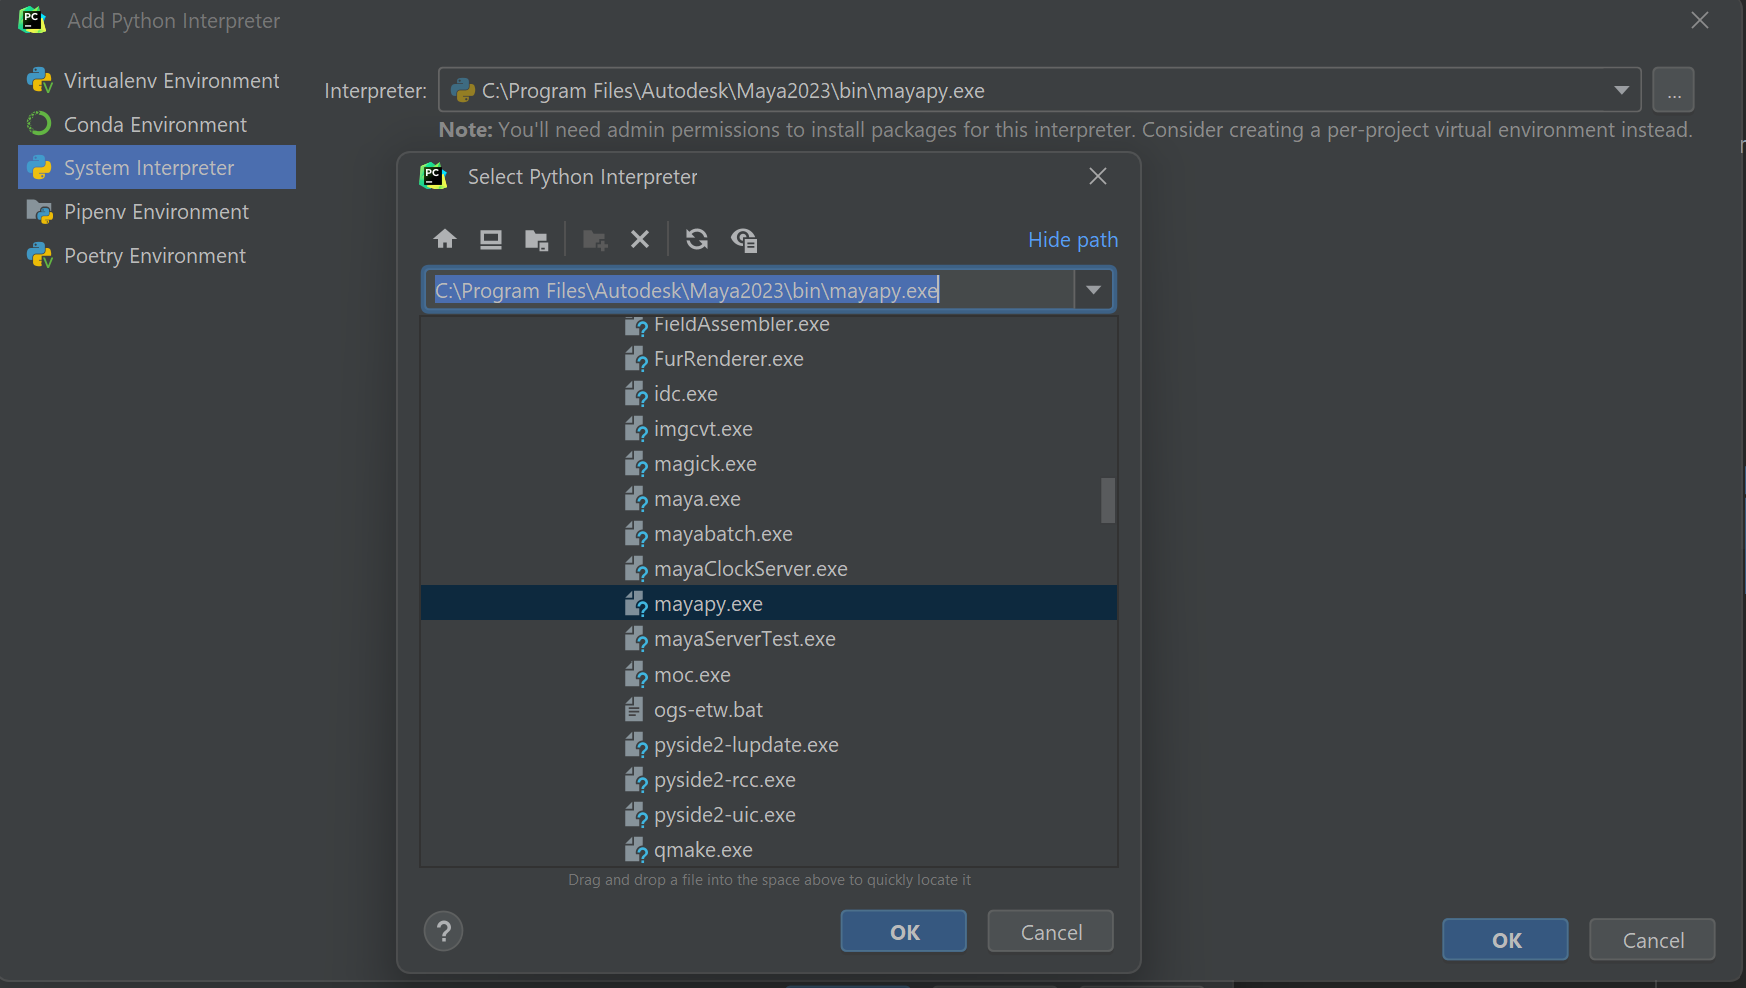
Head over to PyCharm, and on the menu bar,
File -> Settings and follow the screenshots below to configure where your mayapy.exe is located.
If you installed in the default location it is more or less located in somewhere like C:\Program Files\Autodesk\Maya2023\bin\mayapy.exe.
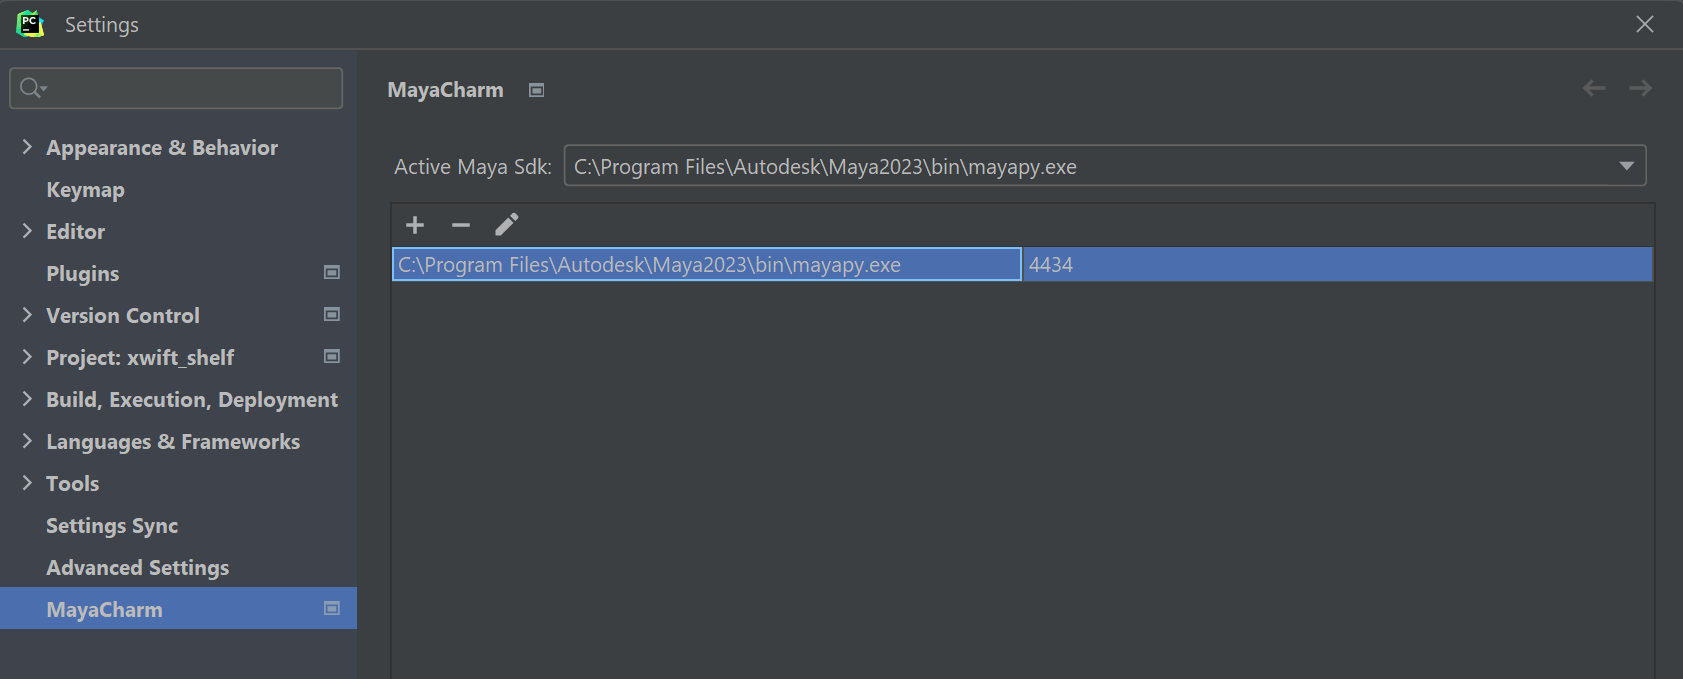
Now, head over to Pycharm menubar File -> Settings -> MayaCharm and configure the active Maya SDK to the mayapy you setup in last step, and port to 4434 as shown below.
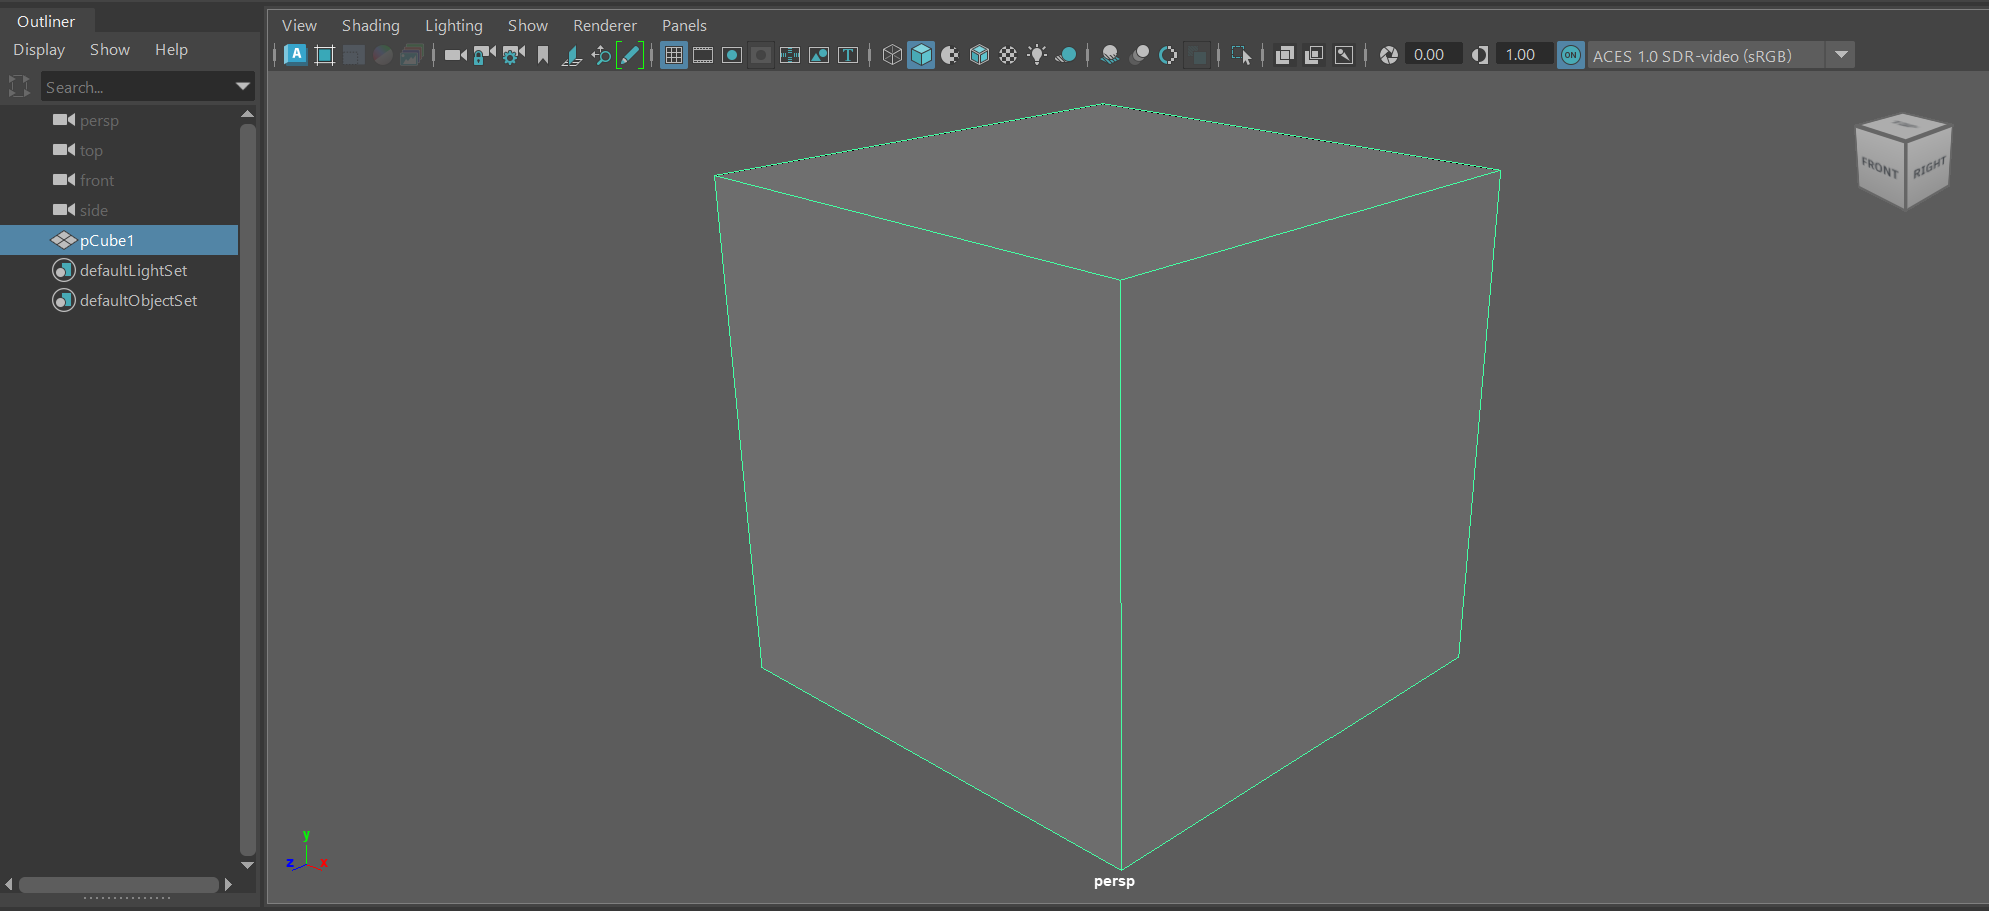
To test whether you have your Mayacharm setup well, do the following:
File -> New -> Python File to make a new script.Alt+A.
                import maya.cmds as cmds

                # Set MayaCharm Port
                if not cmds.commandPort(':4434', q=True):
                    cmds.commandPort(n=':4434')

                # Make a cube!
                cmds.polyCube()
A new cube will be created in the empty Maya scene. Your Mayacharm is fully set!
2.2 - Setup Xwift Shelf
In this section, I will go through how to setup your repository to deploy with Xwift Shelf. Git is not required, all I am showing you is you can store your codebase somewhere else than MAYA_SCRIPT_PATH.
That said, I recommend you organize your code using Github, it is free and easy to use, and literally everyone uses it.
First, create a repository of where you want to store your code. I will use the name "Bananakit" as example. I recommend doing this with from the Github website,
If you get stuck, read this:
After that, open your PyCharm, and on the menu bar, Git -> Clone -> Github and clone your newly created repository.
Note that the repository probably only have very minimal things, and is mostly empty.
                \bananakit
                ----\.git
                ----.gitattributes
Then, go to xwift.hongjunwu.com and download the latest version of Xwift Shelf. Unzip the file and drag the "xwift" folder into your newly created repository. That is,
                \bananakit
                ----\.git
                ----.gitattributes
                ----\xwift
2.3 - Run the Code
To be continued...